Download and Install VM
Download VM
* Download SOA VM files from http://www.oracle.com/technetwork/middleware/soasuite/learnmore/vmsoa-172279.html
* Follow the instructions on the download page on how to combine, import, and use VM, for example:
– Run combine.bat or sh to combine downloaded files
– Or if you have 7-Zip installed, you can highlights all files and select Extract Here… which will combine all files and unzip for you.
Import VM
* Open VirtualBox Manager
* Select File > Import Appliance…
* Click Choose… button and browse to the downloaded .ovf file, e.g. vbox-oel5u4-soabpm-11gr1ps2-bp1-otn.ovf
* Click Next to import
Adjust VM Settings
Adjust System Settings
* Go to Settings > System
* Click Motherboard tab and enter memory, for example:
– Base Memory: 4096
* Click Processor tab and enter processor numbers, for example:
– Processor(s): 2
Adjust Network Settings
* Go to Settings > Network > Adapter 1
* Check that Enable Network Adapter is checked
* Select appropriate Attached to field, e.g. Host-only Adapter
* Expand Advanced and select:
– Adapter Type: Intel PRO/1000 MT Server (82545EM)
Use VM
Start SOA VM
* Start VM
* Login as oracle/oracle
First Time Bootup
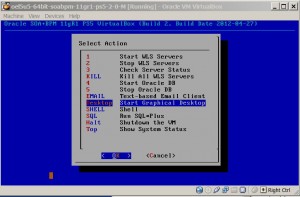
* Select Desktop Start Graphical Desktop
* Select dev_soa domain to use with the VM
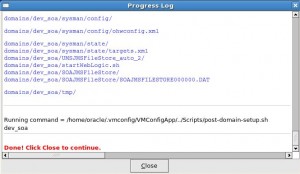
* Click Close button when domain is created.
* From VM Control Center > Server Control tab,
– select Admin Server with SOA and EM
– click Start button
Adjust Display
* After VM has started, minimize and maximize desktop and the VM seems to self adjust.
* You can toggle full screen display by pressing Right Control Key + f
Manually:
* Go to System > Display Settings
* See this post on how to do this.
Install vsftpd
* Alternatively you can use vsftp to transfer files to and from VM.
* vsftpd is already installed on soa box.
* If needed, see this post to configure vsftpd
* Start vsftpd
# su as root
su -

# Setup autostart
chkconfig vsftpd on

# Start
service vsftpd start
Start Servers
Start XE Database Server
* Database should have been autostarted
* To manual start, open a terminal and enter:
cd /home/oracle/bin
. ./oracle_env.sh
sqlplus / as sysdba
SQL> startup
Start SOA Server
* When you start SOA server you also start BAM server
* Double click Start/Stop WebLogic Server icon from the VM desktop and select appropriate action:
* Alternatively, use shell scripts:
cd /home/oracle/bin
./start-wls-server.sh
Starting Admin Server with BPM/SOA, BAM, EM .........OK
Allow Access to SOA Server from Outside
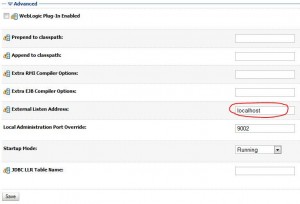
SOA box is configured to allowed access from localhost only. Follow the instruction below to allow access from outside the virtual box.
* Login WLS admin console
* In Domain Structure panel, click domain1 > Environment > Servers
* Click AdminServer(admin)
* Expand Advanced section
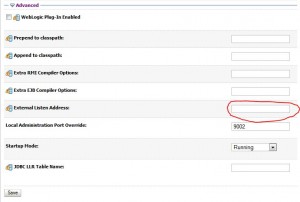
* Remove localhost from the External Listen Address field
* You should have:
* Click Save
* Restart WLS
Access Consoles
From Host Computer
* Find out VM IP address:
[oracle@soabpm-vm ~]$ /sbin/ifconfig
eth0      Link encap:Ethernet  HWaddr 08:00:27:1C:4C:37
          inet addr:192.168.56.101  Bcast:192.168.56.255  Mask:255.255.255.0
* Add an entry to C:\Windows\System32\drivers\etc\hosts file to point to the soa box IP, for example:
192.168.56.101 soabox
* Access consoles from host desktop:
Oracle EM FMW Control: http://soabox:7001/em
Oracle WLS Console: http://soabox:7001/console
Oracle BPM Workspace: http://soabox:7001/bpm/workspace
Oracle Process Composer: http://soabox:7001/bpm/composer
Oracle BAM: http://soabox:7001/OracleBAM
From VM
Oracle EM FMW Control: http://localhost:7001/em
Oracle WLS Console: http://localhost:7001/console
Oracle BPM Workspace: http://localhost:7001/bpm/workspace
Oracle Process Composer: http://localhost:7001/bpm/composer
Oracle BAM: http://localhost:7001/OracleBAM


VMware Certified Advanced Professional 6 (Desktop and Mobility Deployment) – The industry-recognized VCAP6-DTM Deploy certification validates that you know how to deploy and optimize VMware Horizon 6 (with View) environments. It demonstrates that you have the understanding and expertise essential to leverage best practices to provide a scalable and dependable Business Mobility platform for your company. Some of the subject areas involve: Configuring and managing Horizon View components, configuring cloud pod archituecture, configuring Group Policy settings related to Horizon View, Configuring and optimizing desktop images for Horizon View & Mirage, Configuring and managing App Volumes AppStacks, Configuring desktop pools, Configuring and deploying ThinApp packaged applications, Configuring VMWare Identity Manager, etc.Szumigalski.com was created by Sebastian to spread his enthusiasm for PowerShell & VMWare. Sebastian is an IT expert working in Singapore for more that fifteen years who’s everyday in search of brand-new technological innovation to sharpen his technical abilities & understanding. Ever since, Sebastian has become a member of PowerShell User Group & VMWare VMug group, and has been taking part in all the functions held in Singapore. This blog will disclose just how Sebastian manage to automate his every day duties employing PowerShell. You can get study courses accessible for the VCAP6-DTM examination, which are personally published by Sebastian. Sebastian is accredited with VCAP6-DTM, and is adept with virtualization & server maintenance from four years experience in automation. The demand for VMWare knowledgable admins and engineers are ever-increasing in the modern technology sector. Learn about more about PowerShell & VMWare with Szumigalski.com!